


Distribution lists, Office 365 Groups or Microsoft 365 Groups. Which one is which and when to use them?

Distribution lists are known under a few different names. Distribution groups, contact groups and distribution lists (DL) – all refer to the same feature. The primary purpose of a distribution list is to send emails to multiple recipients – yes, as simple as that. The simplicity of their design and the idea behind distribution lists make them an essential email feature. It’s no wonder they have been around since the earliest versions of Exchange Server and that they can be found in Office 365 (Microsoft 365) as well. Although they have survived in a very similar form there, Office 365 also offers a redesigned variant of distribution lists – Office 365 Groups.
Office 365 Groups vs Microsoft 365 Groups
By the way, Office 365 Groups and Microsoft 365 Groups are the same thing. Officially, they’re called Microsoft 365 Groups after a rebranding, but most people use the old name. You can voice your doubts in the comments if you like.
Microsoft 365 focuses on using the upgraded version of distribution lists – Office 365 Groups. I will start with a quick comparison between the two features. Later on, I will describe a few common administration tasks concerning Office 365 distribution lists.
Distribution lists and Office 365 Groups
In Office 365, distribution lists are slowly losing ground because of Office 365 Groups. The great thing about Groups is that they can serve the very same purpose and have many additional features. They integrate not only with Outlook, but also with SharePoint, Viva Engage, OneNote and other Office 365 services. So, is there a reason to use distribution lists if you can have their upgraded version? It depends.
Office 365 Groups are great for collaboration. Having an automatically-generated SharePoint site collection and integration with other Office 365 features helps users work with each other. However, while a Group is great for particular teams or projects, is it always something worth setting up? There are situations in which you simply want to send emails to a certain collection of contacts. What is the point of cluttering your SharePoint with ghost sites no one will ever use? Dealing with inactive distribution lists is enough of an administrative problem.
If you want to learn more about similarities and differences between the two, take a look at our in-depth comparison between Office 365 Groups and distribution lists.
The fact is, it does not really matter if Office 365 Groups are a better solution or not. Distribution lists still can be found in every Office 365 organization, so it is good to know what exactly you are working with. Especially because there are some distribution lists which you cannot upgrade to Groups.
Distribution list limits in Office 365
There are a few limits which apply to Office 365 distribution lists that you should be aware of:
- member count for a distribution list: 100,000 (50,000 for organizations using AAD Connect, 15,000 if there is a slightly outdated DirSync in place).
- number of lists created by a single user/admin: 300,000.
- number of distribution list owners: 10.
- size for messages sent to lists with 5,000-99,999 members: 25MB.
The limits apply to all Office 365 subscriptions, so it does not matter if you have Office 365 Business Essentials or Office 365 Enterprise E5 subscription – the limits stay the same. The only difference is if you have Exchange Online as a standalone option. In this case, each plan allows one user to create up to 250 instead of 300,000 distribution lists.
A complete summary of distribution list limits is available here.
As you can see, those limits are not real roadblocks in most cases. Together with the fact that contact groups can be user-created, it unfortunately means that cleaning those lists might be a common and repetitive task for each admin.
How to create a new distribution list
To create a new distribution list, connect to Exchange Online with PowerShell and use the New-DistributionGroup cmdlet. For example,
New-DistributionGroup -Name "TestGroup"
creates a universal distribution list called TestGroup, with the TestGroup@company.com SMTP address. That’s the most basic form of the cmdlet, but you can do much more by using additional parameters. I’ll describe the most common ones:
-Memberslets you automatically add a list of email addresses to a newly created DL. You can add multiple addresses – just separate them with commas. After creating a list, you can still use theAdd-DistributionGroupMemberscmdlet to add new email addresses.-ManagedBylets you specify the owners of the list. By default, the admin who creates the list automatically becomes its owner. List owners can modify list properties and manage their members.-PrimarySmtpAddresslets you control the email address of the distribution list. If not specified, the Alias parameter is used to generate the address.-HiddenGroupMembershipEnabledlets you hide members of the list from others. The parameter can be used only when creating a list and cannot be changed afterwards.
How to find & delete inactive distribution lists in Office 365
What is an inactive distribution list? It is a list to which nobody sends any emails. Sometimes, they are created for test purposes or by mistake (and forgotten about), sometimes they are simply created not to be used, ever. An empty distribution list is a list with no members. It is a good practice to remove both empty and inactive lists so as to keep the organization and GAL clean. Although both inactive and empty distribution lists are similar, the way to deal with them is not quite similar.
Now, there is a slight problem with finding inactive distribution lists in Office 365. Normally, back in the old, on-prem days, you could search through message tracking logs to see which distribution lists are in use. What is more, since on the on-prem Exchange the logs are also physical text files, there is no problem in keeping them for as long as you want and even backing them up. As a result, with the right configuration, you could very easily make sure if a distribution list has ever been used.
In Office 365, it is not as simple as that. In this case, you need to connect to Exchange Online with PowerShell and use the PowerShell cmdlet Get-MessageTraceV2 to find the inactive lists. The message trace results generated in this way can show data from the last 90 days with 10 days’ worth of data per query. Since the “expanded” message status is reserved for distribution lists, it can be used to limit the results to those lists only:
Get-MessageTraceV2 -Status expanded -startdate (get-date).AddDays(-10) -EndDate (Get-Date) | group recipientaddress | select name,count
The cmdlet above returns all messages sent to distribution lists within the specified time range of the last 10 days, groups them, and displays the message count. The problem is, this method of determining inactive lists is not that reliable, since not using a distribution list for 10 days (enforced by the cmdlet’s selection limit) does not make this list completely inactive, yet.
Theoretically, you could use the Historical Search feature instead to run a single search for the messages sent in the last 90, and not 10 days. Unfortunately, Start-HistoricalSearch requires either sender, recipient, or messageid attribute to run successfully. Checking all senders manually is not an option, and checking each recipient (distribution list) separately seems counterproductive.
So, as a workaround, you can use the Get-MessageTraceV2 cmdlet up to 9 times with time ranges set in 10-day increments or simply use it periodically (for even a longer stretch of time) and create your own message tracking log – this is a solution we’ll show below.
How to trace inactive distribution lists manually
The cmdlet below gets all messages sent to distribution lists in the last 10 days and exports the most basic information to a CSV.
Get-MessageTraceV2 -Status expanded -startdate (get-date).AddDays(-10) -EndDate (Get-Date) |select received,recipientaddress,status| Export-Csv C:\SentToDL.csv -Append
If you run this script every 10 days, you will be able to log all email sent to distribution lists.
To learn how actively users send messages to distribution lists, run:
import-csv C:\Users\<UserName>\dist2.csv | group recipientaddress | select name,count
The cmdlet returns DL addresses together with a number of emails sent to them. Still, all the data up to now is about active distribution lists. To find out which of the distribution lists in your organizations are inactive, run the following:
$ActiveDL = (import-csv C:\SentToDL.csv | group RecipientAddress).name;

$allDL = (Get-DistributionGroup).PrimarySMTPAddress;

$inactive = $AllDL | where {$activeDL -notcontains $_};

$inactive
You will receive a list of all distribution lists nobody has sent emails to. Mind that the results depend on how long you have been keeping your manual message tracing. What is more, the $inactive variable will include contact groups which have just been created. Therefore, it might be a good idea to delete lists which are included more than once.
How to find & delete empty distribution lists in Office 365
Finding empty distribution lists, on the contrary, is a quick and easy task. Once you establish remote connection to your Office 365 tenant, run the following cmdlet:
get-distributiongroup |? {!(get-distributiongroupmember $_.PrimarySMTPAddress).count}
This one-liner returns all empty distribution lists. To delete them, pipeline the results to Remove-DistributionGroup:
get-distributiongroup |? {!(get-distributiongroupmember $_.PrimarySMTPAddress).count} | Remove-DistributionGroup -WhatIf
the -WhatIf switch only shows you which distribution lists will be deleted. To actually delete them, replace -WhatIf with -Confirm:$false.
Upgrade distribution lists to Microsoft 365 / Office 365 Groups
In early 2023, Microsoft considered deprecating the option to upgrade distribution lists to Office 365 Groups. In mid-2025, however, the option is still in place, though the workflow has been modified. To upgrade a DL, a tenant admin must first send an upgrade request to the DL owner via the Exchange admin center. Next, the DL owner decides whether to proceed with the upgrade. In other words, the upgrade process can only be initiated by tenant admins and completed by DL owners.
To upgrade a distribution list to an Office 365 Group, you need to complete the following steps:
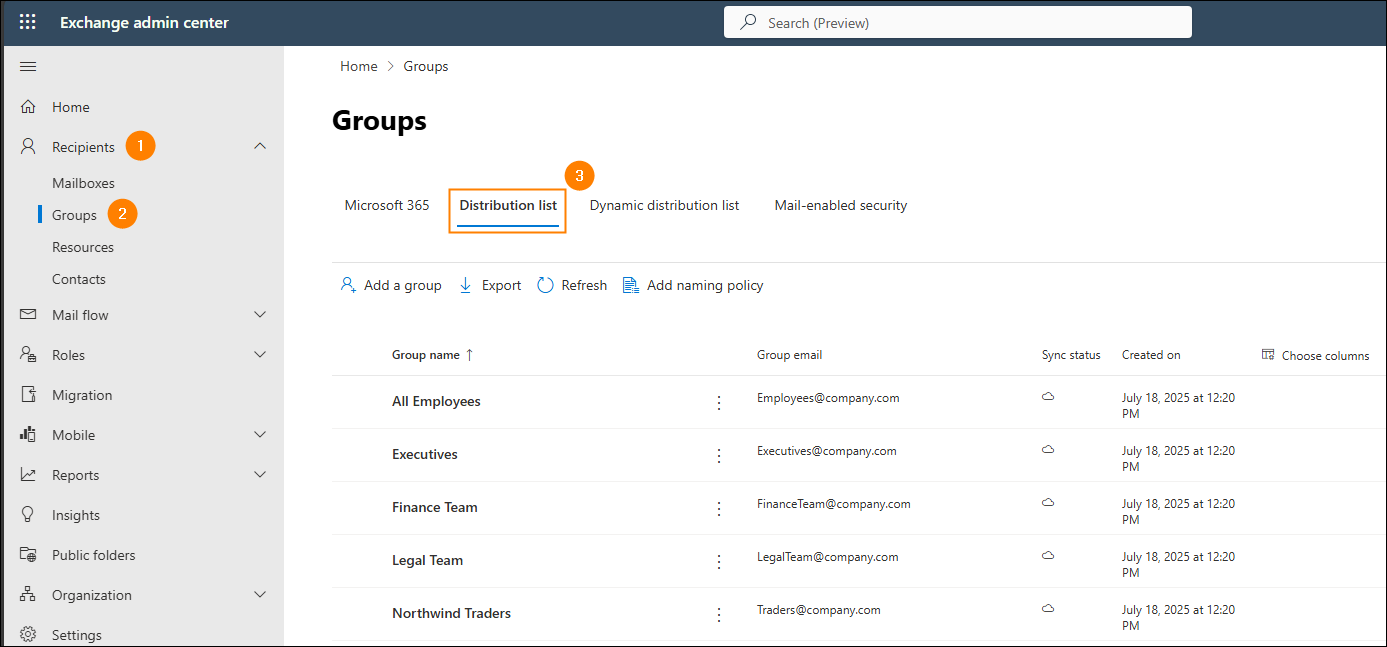
- Sign in to the Exchange admin center using a tenant admin account and go to Recipients > Groups > Distribution list.
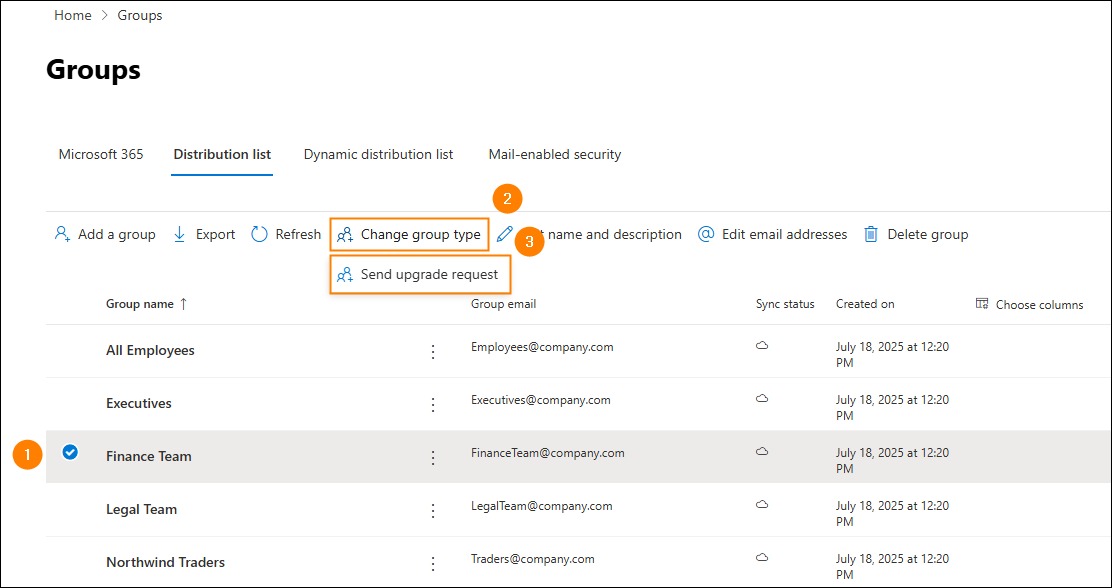
- Select a distribution list you want to upgrade and click Change group type > Send upgrade request.
- If the DL meets upgrade conditions (more on that below), select its owner(s) and click Send Request.
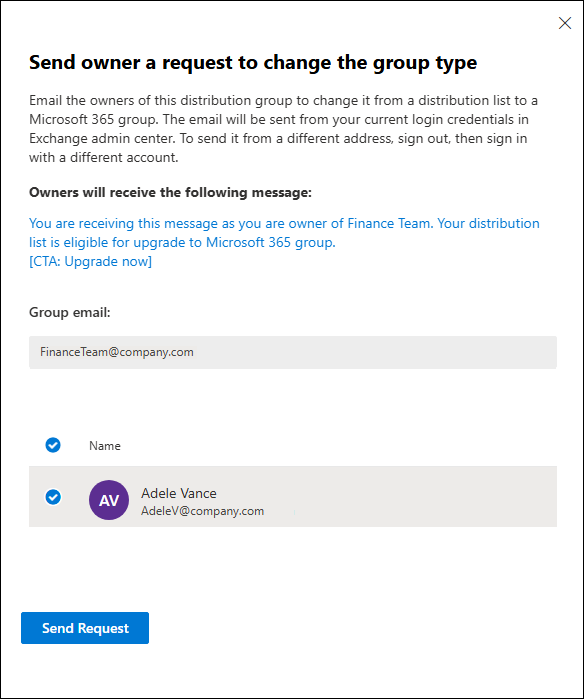
- The DL owner receives an email containing the upgrade request. Once they click the Upgrade button in the email, the DL will upgrade to an Office 365 Group.
To be upgraded, a distribution list must meet certain conditions. To check which DLs in your company qualify, you can use the Get-EligibleDistributionGroupForMigration cmdlet. Below, you can also find some of the reasons why a distribution list cannot be upgraded:
- The distribution list is managed on premises. If you have a directory synchronization in place, you will have to recreate the list in Office 365 before you upgrade it.
- The distribution list is nested. A distribution list cannot have another distribution list as its member and cannot be a member of other groups.
- The distribution list has no owner.
- The list is a dynamic distribution list or a security group.
For a complete summary of distribution lists which are not eligible for upgrade, visit this Microsoft article.
One way to deal with non-upgradable lists is to create them directly in your target tenant. If you want to recreate distribution lists in Exchange Online, you need to migrate them.
Migrate a distribution list to Office 365
Distribution list migration is an elaborate name for exporting and then importing DLs, along with their member lists. To export distribution list members to a CSV file, run the following cmdlet:
Get-DistributionGroupMember "DistributionGroupName" | Export-Csv dl.csv
The cmdlet will create a CSV file in your current location. If a list contains nested groups, it is a good idea to export their members directly into the target CSV.
Get-DistributionGroupMember "DistributionGroupName" | where recipienttype -eq "UserMailbox" | export-csv nested.csv -Append;
$nested = (Get-DistributionGroupMember "DistributionGroupName" | where recipienttype -ne "UserMailbox");
foreach ($list in $nested)
{Get-DistributionGroupMember $list.PrimarySmtpAddress | export-csv nested.csv -append}
This short script will add all distribution list members, including those from nested groups, directly to the CSV file of your choosing. After that, if you want to create a new distribution list and import members in bulk, first create the list and assign its owner:
New-DistributionGroup "Example" -ManagedBy "Admin"
After that, use the CSV file you created earlier to populate the new list:
$dlmembers = import-csv testers.csv

foreach ($dlmember in $dlmembers) {Add-DistributionGroupMember "Example" -member $dlmember.PrimarySmtpAddress}
As a result, you will recreate a distribution list in the target tenant.
Useful articles:
- Best tools for Microsoft 365 administrators
- How to archive former employees’ mailboxes in Microsoft 365?
- How to set up different email signatures for shared mailbox and user mailbox in Microsoft 365?