


See how to create a company email signature with Active Directory user data using VBScript. It’s not perfect, but it’s free!

[Update]: This article was updated on November 4, 2024. While the methods in this article still work, there are two issues that can sabotage your email signature management efforts: VBScript’s end of life and Outlook’s signature cloud settings.
If you’re looking for another VBScript to create an HTML email signature in Outlook, see this article.
Setting up an email signature for each Outlook user in the organization can be a time-consuming job, especially when performed manually. Moreover – every time a change in the signature is required the whole process needs to be repeated.
That is why system administrators are searching the web for a more centralized way of performing this task. One of the possible solutions is to run a logon script, distributed to workstations via the Group Policy Object. When the end user logs on, the script gathers information about that particular person from Active Directory and creates a personalized email signature in Outlook. Below, you will find a guide on how to configure such a script. But first, let’s see what you need to know before you even start.
Before you begin
At the time of updating this article, the VBScript still works, and the method I present might still be useful in some scenarios. There are a few “buts”, though:
Signature cloud settings aka roaming signatures
Roaming signatures is a feature that affects Microsoft 365 accounts connected with Outlook. It changes the location of email signatures from the local roaming profiles to the cloud.
Since my scripts create email signatures in the legacy location (roaming profiles), this part of the script becomes useless. You can still use the script to generate personalized email signature designs, but you’ll need to find another way to distribute them across your company.
See what roaming signatures are all about
VBScript’s end of life
It’s been over 10 years since the last VBScript update. It was only a matter of time before Microsoft decided to deprecate it. Now, the date is set and VBScript’s days are numbered.
Learn more about VBScript’s upcoming demise
New Outlook for Windows
New Outlook for Windows has nothing to do with the local email signature folder. All signatures are in the cloud by default, right from the start. So, just like with signature cloud settings, you can benefit from the generative part of my script, but the distribution method won’t be of much help.
Script preparation
Firstly you need a VBScript that creates a signature in Outlook. Below you can find an example code, that reads user’s information from Active Directory. That information is then inserted into the signature. Lastly, the script sets the signature to be added to new emails and reply emails.
On Error Resume Next

Set objSysInfo = CreateObject("ADInformation")

strUser = objSysInfo.UserName
Set objUser = GetObject("LDAP://" & strUser)
If objUser Is Empty Then _
MsgBox "No connection with LDAP information.", _
vbCritical, "Error": Exit Sub

strName = objUser.FullName
strTitle = objUser.Title
strDepartment = objUser.Department
strCompany = objUser.Company
strPhone = objUser.telephoneNumber

Set objWord = CreateObject("Word.Application")

Set objDoc = objWord.Documents.Add()
Set objSelection = objWord.Selection

Set objEmailOptions = objWord.EmailOptions
Set objSignatureObject = objEmailOptions.EmailSignature

Set objSignatureEntries = objSignatureObject.EmailSignatureEntries

' Beginning of signature block

objSelection.TypeText strName & ", " & strTitle
objSelection.TypeParagraph()
objSelection.TypeText strDepartment
objSelection.TypeParagraph()
objSelection.TypeText strCompany
objSelection.TypeParagraph()
objSelection.TypeText strPhone

' End of signature block

Set objSelection = objDoc.Range()

objSignatureEntries.Add "AD Signature", objSelection
objSignatureObject.NewMessageSignature = "AD Signature"
objSignatureObject.ReplyMessageSignature = "AD Signature"

objDoc.Saved = True
objWord.Quit
Simply copy the above text into any plain text editor (e.g. Windows Notepad) and save it with the VBS file extension.
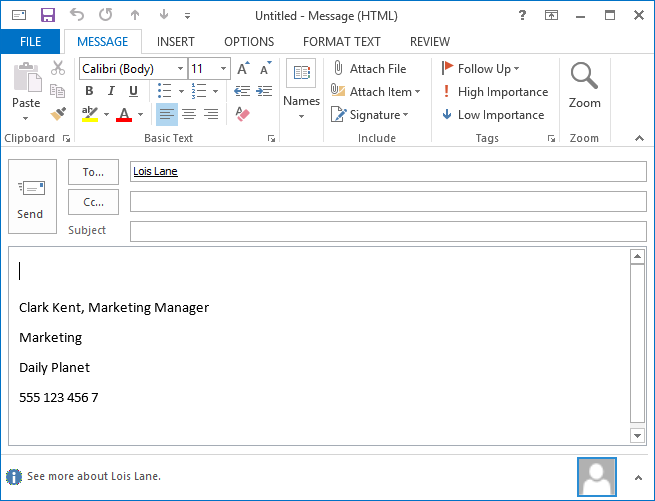
To test the script execute it on a workstation with Outlook installed (make sure that Outlook is not running). Next time you launch Outlook and create a new message it should contain a signature, similar to the example below:
To modify the signature change the code between ‘ Beginning of signature block and ‘ End of signature block in the script. Let’s say you need to add user’s email address at the very end of the signature. You can do this by adding the following line in the signature block of the script:
objSelection.TypeParagraph()
objSelection.TypeText strEmail
The resulting signature block in the script is as follows:
' Beginning of signature block

objSelection.TypeText strName & ", " & strTitle
objSelection.TypeParagraph()
objSelection.TypeText strDepartment
objSelection.TypeParagraph()
objSelection.TypeText strCompany
objSelection.TypeParagraph()
objSelection.TypeText strPhone
objSelection.TypeParagraph()
objSelection.TypeText strEmail

' End of signature block
To enter any string of text that is not dynamically gathered from Active Directory, simply replace the placeholder part of the objSelection.TypeText command (e.g. strEmail) with a text placed between the quotation marks. In the example below the environmental disclaimer is added:
' Beginning of signature block

objSelection.TypeText strName & ", " & strTitle
objSelection.TypeParagraph()
objSelection.TypeText strDepartment
objSelection.TypeParagraph()
objSelection.TypeText strCompany
objSelection.TypeParagraph()
objSelection.TypeText strPhone
objSelection.TypeParagraph()
objSelection.TypeText strEmail
objSelection.TypeParagraph()
objSelection.TypeText "Please consider the environment before printing this message."

' End of signature block
Adding images and advanced formatting
Email signatures work best when they are formatted in tables. This way, they should keep their formatting regardless of your recipients’ email clients or devices.
However, advanced formatting as well as images make it trickier to create a working script file. The sample script presented below adds a company logo and social media buttons to the signature.
On Error Resume Next

Set objSysInfo = CreateObject("ADSystemInfo")

strUser = objSysInfo.UserName

Set objUser = GetObject("LDAP://" & strUser)

If IsEmpty(objUser) Then

MsgBox "No connection with LDAP information.", vbCritical, "Error": WScript.Quit (1)

strName = objUser.FullName

strTitle = objUser.Title

strDepartment = objUser.Department

strCompany = objUser.Company

strPhone = objUser.telephoneNumber

'location of logo and social media images. Mind to use links to a network share, to which users will have access.

strLogo = 'logo image location

strSoc1 = '1. social media button location

strSoc2 = '2. social media button location

strSoc3 = '3. social media button location

strSoc4 = '4. social media button location

strFBlink = '1. link to social media website

strYTlink = '2. link to social media website

strTWlink = '3. link to social media website

strLNlink = '4. link to social media website

Set objWord = CreateObject("Word.Application")

Set objDoc = objWord.Documents.Add()

Set objSelection = objWord.Selection

Set objEmailOptions = objWord.EmailOptions

Set objSignatureObject = objEmailOptions.EmailSignature

Set objSignatureEntries = objSignatureObject.EmailSignatureEntries

' Beginning of signature block

Set objRange = objDoc.Range()

'Create table for signature content

objDoc.Tables.Add objRange,6,5

Set objTable = objDoc.Tables(1)

objdoc.Paragraphs.SpaceAfter = 0

'Merge selected table cells

objTable.Cell(1,1).Merge objTable.Cell(5,1)

objTable.Cell(1,2).Merge objTable.Cell(1,5)

objTable.Cell(2,2).Merge objTable.Cell(2,5)

objTable.Cell(3,2).Merge objTable.Cell(3,5)

objTable.Cell(4,2).Merge objTable.Cell(4,5)

objTable.Cell(5,2).Merge objTable.Cell(5,5)

'Add the company logo

objTable.Cell(1,1).Range.InlineShapes.AddPicture(strLogo)

'Add user's data

objTable.Cell(1,2).Range.Font.Name = "Calibri"

objTable.Cell(1,2).Range.Font.Size = "10"

objTable.Cell(1,2).Range.Font.Bold = True

objTable.Cell(1,2).Range.Text = strName & ", " & strTitle

objTable.Cell(2,2).Range.Font.Name = "Calibri"

objTable.Cell(2,2).Range.Font.Size = "10"

objTable.Cell(2,2).Range.Font.Bold = False

objTable.Cell(2,2).Range.Text = strDepartment

objTable.Cell(3,2).Range.Font.Name = "Calibri"

objTable.Cell(3,2).Range.Font.Size = "10"

objTable.Cell(3,2).Range.Font.Bold = False

objTable.Cell(3,2).Range.Text = strCompany

objTable.Cell(4,2).Range.Font.Name = "Calibri"

objTable.Cell(4,2).Range.Font.Size = "10"

objTable.Cell(4,2).Range.Font.Bold = False

objTable.Cell(4,2).Range.Text = "P: " & strPhone

objTable.Cell(5,2).Range.Font.Name = "Calibri"

objTable.Cell(5,2).Range.Font.Size = "10"

objTable.Cell(5,2).Range.Font.Bold = False

objTable.Cell(5,2).Range.Text = "www.my-company.com"

'Add social media buttons

objtable.Cell(6,2).width = 24

objtable.Cell(6,2).height = 24

objTable.Cell(6,2).Range.InlineShapes.AddPicture(strSoc1)

objDoc.Hyperlinks.Add objDoc.InlineShapes.Item(2), strFBlink

objtable.Cell(6,3).width = 24

objtable.Cell(6,3).height = 24

objTable.Cell(6,3).Range.InlineShapes.AddPicture(strSoc2)

objDoc.Hyperlinks.Add objDoc.InlineShapes.Item(3), strYTlink

objtable.Cell(6,4).width = 24

objtable.Cell(6,4).height = 24

objTable.Cell(6,4).Range.InlineShapes.AddPicture(strSoc3)

objDoc.Hyperlinks.Add objDoc.InlineShapes.Item(4), strTWlink

objtable.Cell(6,5).width = 24

objtable.Cell(6,5).height = 24

objTable.Cell(6,5).Range.InlineShapes.AddPicture(strSoc4)

objDoc.Hyperlinks.Add objDoc.InlineShapes.Item(5), strLNlink

' End of signature block

Set objSelection = objDoc.Range()

objSignatureEntries.Add "AD Signature", objSelection

'objSignatureObject.NewMessageSignature = "AD Signature"

'objSignatureObject.ReplyMessageSignature = "AD Signature"

objDoc.Saved = True

objWord.Quit
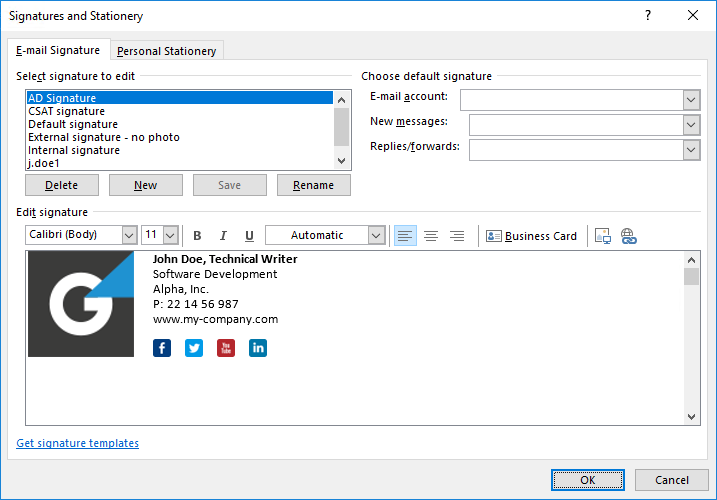
Running the script results in the following signature:
Distributing the signature via GPO
To distribute the script automatically to all workstations in the organization, the easiest way is to use a GPO policy. This method will provide every single user with the signature when they log on.
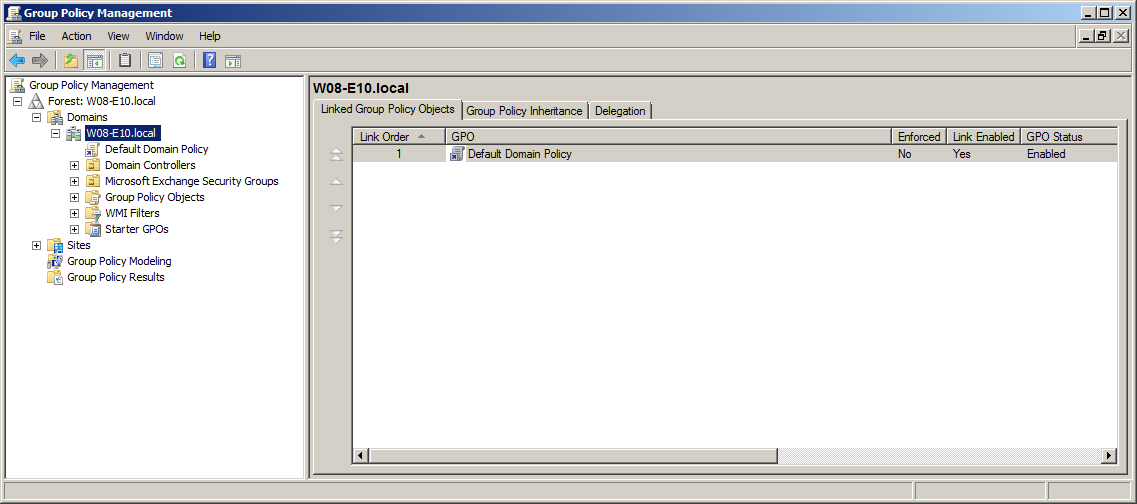
To begin log on to your server and click the Start menu button, then select Administrative Tools menu and click Group Policy Management. Alternatively you can run the gpmc.msc command in the Start menu search field. This opens the main GPO console window:
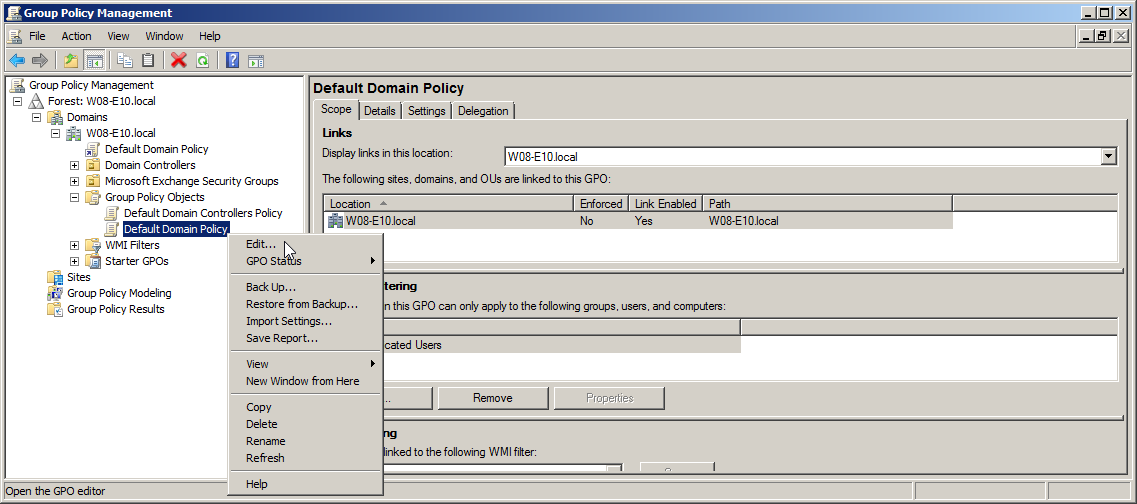
In the left pane expand the branch with your server name, then expand Group Policy Objects. Next right-click the Default Domain Policy object select Edit.
In the Group Policy Management Editor navigate to User Configuration in the left pane, then go to: Policies, Windows Settings, Scripts (Logon/Logoff).
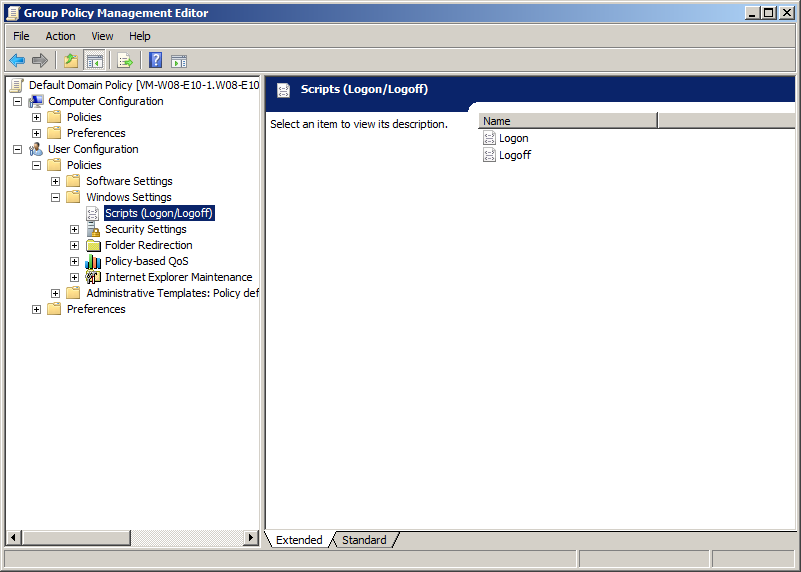
Next, double click the Logon option visible in the right pane to launch the Logon Properties window. Then click the Show Files… button to open the folder containing scripts. Copy your VBScript into that folder. Next, in the Logon Properties window click the Add… button and select the script file that you just copied in by clicking the Browse… button.

Save the settings by clicking the OK button all the way down.
That’s it – next time your users log on to their workstations, the script will launch and create the Outlook signature that contains user’s AD information.
Limitations and how to overcome them
This method is fairly useful. However, it has some drawbacks:
- Users can modify their signatures before sending which might breach the unified signature look policy in your company.
- Those signatures are made available in Outlook for Windows only.
- Every change in the signature requires all users to log off and log back on to re-run the script and apply changes.
- Signature editing is quite complicated and requires a bit of programming knowledge.
- Administrative access to the server is required.
- There is no way to use Custom/Extension attributes or conditional placeholders to fully automate integrations with customer satisfaction.
- It wasn’t tested with LDAPS. Feel free to check if it works with port 636.
Fortunately there are more user friendly solutions, such as CodeTwo Exchange Rules and CodeTwo Exchange Rules Pro (for the on-premises Exchange Server) or CodeTwo Email Signatures 365 (for Microsoft 365 environments). Not only do they overcome all above limitations, but also deliver much more features:
- Easy to use GUI that lets you create any kind of signature in a friendly way;
- A signature testing facility allows to check and see how your signature template looks like before deploying it to the live environment;
- It supports all emails processed by the Exchange transport service, no matter from what email client they were sent by the end user;
- The program provides a remote access to the signature deployment. This way the process can be delegated to e.g. your marketing team without giving them direct access to the server;
- A rich library of ready to use signature templates is available;
- All email formats are supported – no matter it’s HTML, Plain Text, or RTF;
- You can download and use the fully functional program for 30 days (or 14 days in the case of CodeTwo Email Signatures 365) to see if it suit your needs.
- And more.