





A quick PowerShell tutorial that shows how to grant full-access permissions to all user mailboxes.
There are many situations in which permissions to another user’s mailbox should be granted in Exchange Server. Sometimes it is for monitoring purposes, sometimes to send emails on behalf of someone else. Full access permissions give the highest level of access to a mailbox, and are necessary, for example, during a migration process. If you want to learn how to set full access permissions in Exchange 2019, Exchange 2016, Exchange 2013, or Exchange Online, you have come to the right place.
If you want to learn more about how to perform an Exchange Server to Microsoft 365 (Office 365) migration using native means, check this article.
How to set full access permissions with PowerShell
To set those permissions for a user account, you need to use an account that’s added to the Organization Management group.
To check which accounts are members of the group, use this cmdlet:
Get-RoleGroup "Organization Management" | select membersIn case the account is not listed in the results, the administrator can add it to the group by using this cmdlet:
Add-RoleGroupMember "Organization Management" -Member "<account name>"<account name> stands for the name of the desired user.
The next step is granting full access permissions to mailboxes:
Get-Mailbox -ResultSize unlimited -Filter {(RecipientTypeDetails -eq 'UserMailbox') -and (Alias -ne 'Admin')} | Add-MailboxPermission -User admin@example.com -AccessRights fullaccess -InheritanceType all -AutoMapping:$falseThis will grant full access rights to all users for the admin account “admin@example.com”. The last parameter, ‑AutoMapping:$false is not necessary but recommended. It enables you to turn the auto-mapping feature off. Otherwise, if auto-mapping is enabled, it causes the admin’s Outlook to try and open all mailboxes in the company (to which the admin has now full access). This is rarely desirable and in case there are a lot of mailboxes, performance issues are to be expected. What is more, in many scenarios, users have experienced that removing auto-mapping later on might be problematic, especially with Outlook trying to open multiple mailboxes at once – the email client tends to lag or freeze for some time. To remove automapping with PowerShell, an admin needs to remove full access permissions first and then add them again, with the -AutoMapping $false switch.
If you want to limit the number of mailboxes you assign permissions to, you can:
- change the arguments used in the -Filter parameter, for example, add another condition to the already specified, like
-and (City -eq 'New York'), - use
Get-DistributionGroupMemberinstead ofGet-Mailboxbefore the pipeline (separator, |) symbol, - If you want to add Full Access permissions to a single mailbox (user@example.com in the example below), simply use the following syntax:
Add-MailboxPermission -Identity 'user@example.com' -AccessRights FullAccess -InheritanceType all -AutoMapping:$false
How to grant other permission types
PowerShell can also be used to assign other permissions to mailboxes. Below is the list of valid parameter values:
ChangeOwner– allows to change mailbox owner,ChangePermission– lets the assigned users to change permissions on the mailbox,DeleteItem– allows to delete items from a mailbox,ExternalAccount– indicates the mailbox isn’t in the same domain,ReadPermission– lets you read mailbox items.
To assign one of those permissions, use its name after the -AccessRights parameter, instead of FullAccess.
Alternative to PowerShell
For older Exchange versions (those you shouldn’t see in production environments anymore), you can grant full access permissions using Exchange Management Console (EMC). This is, however, not recommended, as auto-mapping cannot be switched off using EMC. However, if you want to assign mailbox permissions to a single mailbox and automapping is not an issue, go ahead.
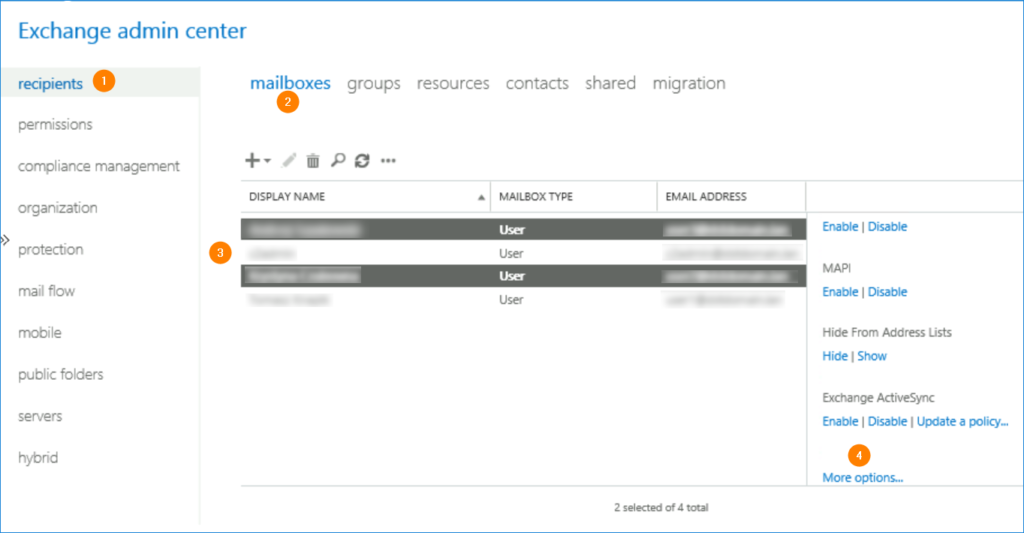
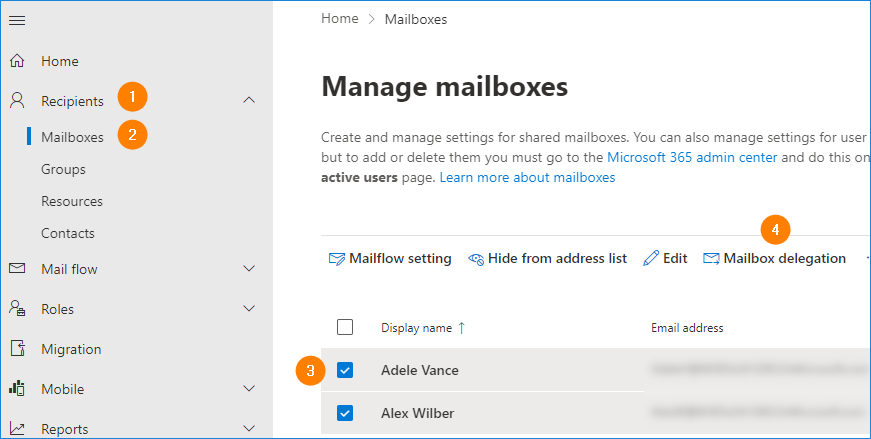
For supported Exchange versions, you can use the Exchange admin center (EAC) to assign permissions, by going to Exchange admin center > recipients > mailboxes. Highlight the mailboxes you want to grant access to and click More options in the right pane.
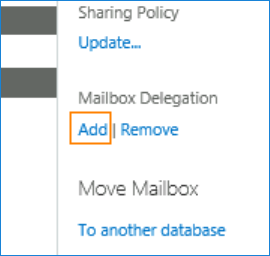
Then, still in the right pane, click Add in the Mailbox Delegation section.
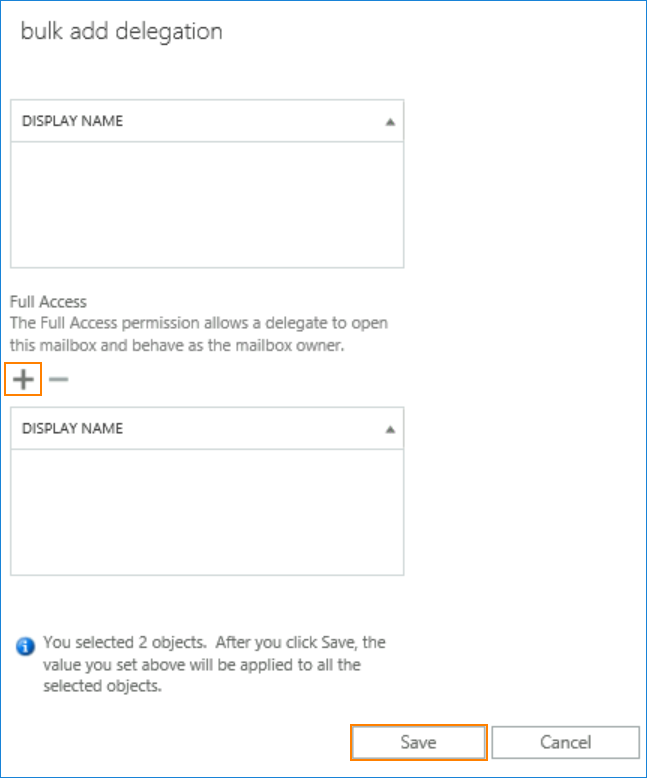
Finally, use the plus button and choose a user (or users) who should have the Full Access permission to the chosen mailboxes.
In Exchange Online, the path to mailbox permission assignment settings is similar, the only difference is in the UI layout:
Software tip
If you need any help with administration of your Exchange server or Microsoft 365 tenant, check how CodeTwo products can help you. For example:
- CodeTwo Exchange Migration – simplifies your move to a more recent Exchange version.
- CodeTwo Office 365 Migration – gives a helping hand when you want to move mailboxes from on-premises Exchange to the cloud (or between Microsoft 365 tenants).
- CodeTwo Exchange Rules Pro – unifies branding in email communication and helps manage mail flow in on-premises Exchange.
- CodeTwo Email Signatures 365 – lets you manage email branding and autoresponders in Microsoft 365.
There are also many useful freeware tools, so be sure to check them out, too.