

Close Menu
Altcoinvest
    What's Hot

    Ex-White House Teleprompter Operator Fined for Prediction Market Insider Trading

    August 31, 2026

    PWT is available for trading!

    August 31, 2026

    Google Maps Switches Lake Ontario to Lake America for U.S. Users After Trump Order

    August 31, 2026
    Facebook X (Twitter) Instagram
    Altcoinvest
    • Bitcoin
    • Altcoins
    • Exchanges
    • Youtube
    • Crypto Wallets
    • Learn Crypto
    • bitcoinBitcoin(BTC)$77,598.00-0.60%
    • ethereumEthereum(ETH)$2,415.17-1.66%
    • tetherTether(USDT)$1.00-0.01%
    • binancecoinBNB(BNB)$683.62-1.63%
    • rippleXRP(XRP)$1.35-3.11%
    • usd-coinUSDC(USDC)$1.00-0.01%
    • solanaSolana(SOL)$101.56-3.39%
    • tronTRON(TRX)$0.336088-1.23%
    • Figure HelocFigure Heloc(FIGR_HELOC)$1.000.00%
    • HyperliquidHyperliquid(HYPE)$80.26-3.23%
    Altcoinvest
    Home»Exchange»How to Use Sconfig on Windows Server 2022 Core Running Exchange Server 2019
    How to Use Sconfig on Windows Server 2022 Core Running Exchange Server 2019
    Exchange

    How to Use Sconfig on Windows Server 2022 Core Running Exchange Server 2019

    April 13, 2025
    Share
    Facebook Twitter LinkedIn Pinterest Email

    Windows Server 2022 Core provides a minimalistic and lightweight installation option for running various server applications, including Exchange Server 2019. To manage and configure the server, Microsoft provides a command-line tool called Sconfig. In this guide, we will walk you through the steps to use Sconfig on Windows Server 2022 Core that runs Exchange Server 2019.

    Step 1: Accessing the Command Prompt

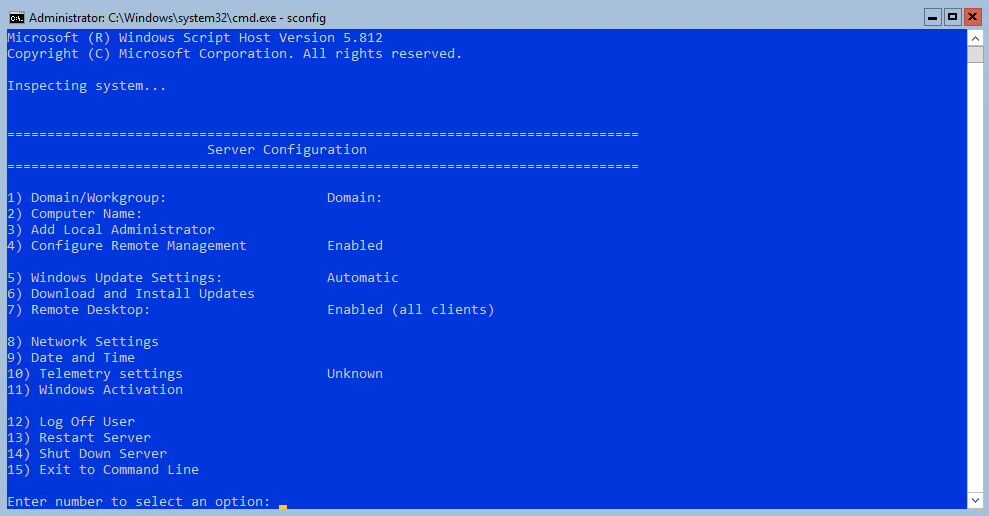
    First, you need to access the command prompt on your Windows Server 2022 Core, this normally comes up when you access the server and login or are already logged in. Here is a screenshot of what it looks like:
    How to Use Sconfig on Windows Server 2022 Core Running Exchange Server 2019
    How to use sconfig on windows server 2022 core running exchange server 2019

    Step 2: Launching Sconfig

    Once you have the command prompt open, type sconfig and press Enter. This will launch the Sconfig utility, which provides a simple menu-based interface for configuring your server.

    Step 3: Configuring Network Settings

    The first option in the Sconfig menu is Network Settings. You can use this option to configure network settings such as IP address, subnet mask, default gateway, and DNS server. Select the appropriate option and follow the prompts to configure your network settings.

    Step 4: Joining a Domain

    If you want to join your Windows Server 2022 Core to a domain, you can use the Domain/Workgroup option in the Sconfig menu. Select the option and provide the necessary information to join the domain.

    Step 5: Windows Update Settings

    Keeping your server up to date is crucial for security and performance. The Windows Update Settings option in Sconfig allows you to configure how Windows updates are installed on your server. You can choose to install updates automatically or manually.

    Step 6: Remote Desktop

    If you need to enable Remote Desktop access to your server, you can use the Remote Desktop option in Sconfig. Select the option and follow the prompts to enable Remote Desktop.

    Step 7: Changing the Computer Name

    If you want to change the computer name of your Windows Server 2022 Core, you can use the Computer Name option in Sconfig. Select the option and provide the new computer name.

    Step 8: Configuring Date and Time

    Accurate date and time settings are essential for various server functionalities. The Date and Time option in Sconfig allows you to configure the date, time, and time zone settings on your server.

    Step 9: Quitting Sconfig

    Once you have completed the necessary configurations, you can choose the Exit option in the Sconfig menu to quit the utility. This will return you to the command prompt.

    Using the Sconfig utility on Windows Server 2022 Core provides a straightforward way to manage and configure your server running Exchange Server 2019. By following the steps outlined in this guide, you can easily set up and customize your server to meet your specific requirements.

    Remember to regularly check for updates and perform necessary maintenance tasks to ensure the smooth operation of your server and Exchange Server 2019. We hope you find it helpful.

    Like this:

    Like Loading…

    Related

    Share. Facebook Twitter Pinterest LinkedIn Tumblr Email

    Related Posts

    Security Updates Exchange 2016-SE (Aug2026)

    August 11, 2026

    How to Remove OneDrive Photos App

    August 3, 2026

    MVPs around the World (2026)

    August 3, 2026

    Security Updates Exchange 2016-SE (Jul2026)

    July 15, 2026
    Add A Comment

    Comments are closed.

    Tweets by InfoAltcoinvest

    Top Posts

    Security Updates Exchange 2016-SE (Aug2026)

    August 11, 2026

    How to Remove OneDrive Photos App

    August 3, 2026

    MVPs around the World (2026)

    August 3, 2026

    A HURRICANE is about To Hit Crypto… (HUGE NEWS!!)

    February 1, 2026

    BNB Now Available on Gemini in a Milestone for US Users’ Access

    December 27, 2025

    Wall Street Goes All-In on Blockchain Infrastructure in 2026

    June 21, 2026

    Memecoins Struggle as 11.6 Million Tokens Fail –

    January 14, 2026

    Altcoinvest is a leading platform dedicated to providing the latest news and insights on the dynamic world of cryptocurrencies.

    We're social. Connect with us:

    Facebook X (Twitter)
    Top Insights

    Ex-White House Teleprompter Operator Fined for Prediction Market Insider Trading

    August 31, 2026

    PWT is available for trading!

    August 31, 2026

    Google Maps Switches Lake Ontario to Lake America for U.S. Users After Trump Order

    August 31, 2026
    Get Informed

    Subscribe to Updates

    Get the latest creative news from FooBar about art, design and business.


    Facebook X (Twitter)
    • Home
    • About us
    • Contact Us
    • Privacy Policy
    • Terms & Conditions
    © 2026 altcoinvest.com

    Type above and press Enter to search. Press Esc to cancel.